
openpilot port guide for Toyota models
openpilot is an open source driving agent, maintained by comma.ai and currently compatible with several Honda and Toyota car models.

The purpose of this post is to provide a simple how-to guide to port openpilot on currently unsupported Toyota models and trims. Making an openpilot port means you’ll have to fork the openpilot repo, change the code to incorporate the new car model or trim you want to have supported, and finally submit your pull request.
Why Toyota? Because Toyota cars are great! By default, almost every model is equipped with Toyota Safety Sense Plus (TSS-P), including the Camry and the Corolla, two of the three most sold cars in America. TSS-P means that the car has both adaptive cruise control and lane keep assist features, and therefore a by-wire way to control the longitudinal motion (gas and brake) and the lateral motion (steer). Here is a handy summary of the ADAS features on each Toyota model.
Tools required and dependencies: EON or NEO with latest openpilot installed, Panda, Toyota Giraffe, a Toyota with TSS-P, a computer. This guide is written for openpilot v0.4.1.
Background requirements: basic knowledge of CAN, dbc files, Python, Vim, Git/GitHub, F=ma.
Quick process overview and git repo setupPermalink
Toyota vehicles with TSS-P use two Electronic Control Units (ECUs) to control the car: the Driving Support Unit (DSU) controls the longitudinal motion, while the Forward Recognition Camera (FRC) controls the lateral motion. openpilot is capable of substituting those ECUs, so that the stock Adaptive Cruise Control and the Lane Keep Assist features are replaced by openpilot functionalities.
To prepare for the required SW changes, start with forking the openpilot repo on GitHub.
Step 1 — Connect EON and Panda to vehicle’s CANPermalink
First things first, you need to communicate with the car by intercepting CAN traffic in a convenient location. The best spot is where the FRC is plugged in which is on the windshield behind the rear view mirror. To remove the plastic cover, you first need to unlock it by sliding it downwards parallel to the windshield.
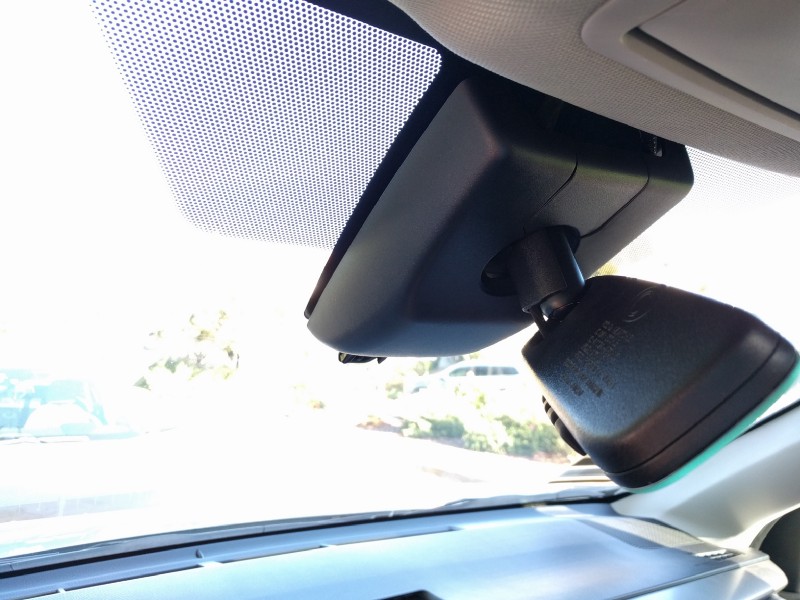
You will notice that the plastic cover is an assembly of two pieces. You can pull the small one out so in order to fully uncover the FRC wiring without having to remove the rear view mirror.

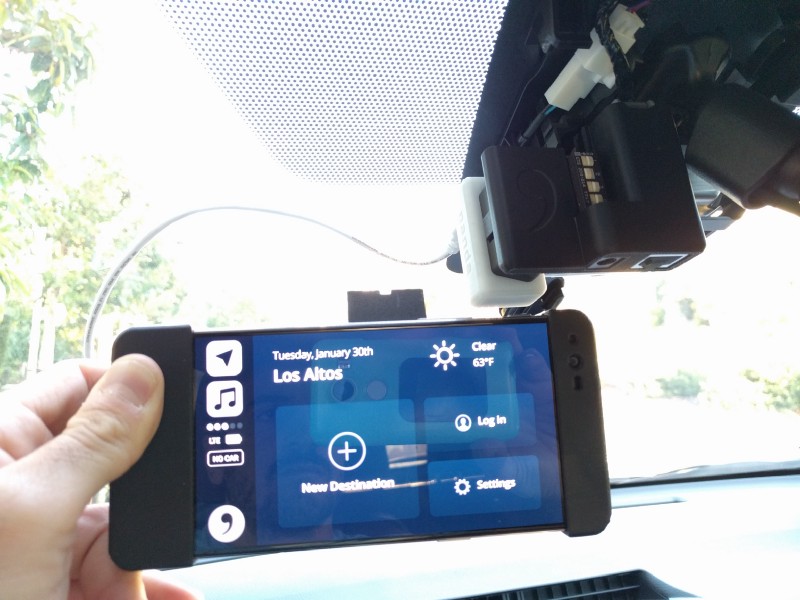
Unplug the FRC connector and connect a Panda to the car’s CAN using the Toyota Giraffe. Make sure the Giraffe’s switches 1, 3, 4 are on (towards the numbers), and switch 2 is off. Switches 1 and 4 allow the FRC to be powered and connected to the vehicle’s CAN, while switch 3 powers the Panda when the car is turned on.
Now connect the Panda to the EON via mini-USB. Don’t worry about mounting the EON on the windshield yet, there is more work to do that does not require driving.
Your EON (through the Panda) now has access to the 2 CAN buses the FRC is connected to. CAN bus 0 will from now on be referred to as the Powertrain CAN Bus: it contains messages related to vehicle speed, steering, acceleration etc… CAN bus 1 will be referred to as the Radar CAN Bus, since you can find information about the radar points sent by the Radar Module and other information sent by the FRC.
Step 2 — Determine your CAN FingerprintPermalink
The next step is detecting the list of CAN messages present on the Powertrain CAN Bus. The assumption is that every car model can be uniquely identified by the set of CAN messages on the Powertrain CAN Bus. Acquiring such a list is what we refer to as “fingerprinting” the car.
Use a computer to remotely SSH into the EON. First, you need to download the EON’s private key onto your computer: the key can be found in the latest NEOS release, at neos/key/id_rsa. You can find the EON IP address in Settings->Wi-Fi Settings->(Top right menu)->Advanced.
Once you are SSH’d into the EON, type tmux ato attach to the current running tmux session.
Here a quick tmux guide (on the EON Ctrl-b is replaced by backtick). Note: a tmux session is always launched when the EON boots up. This tmux session has privileges in accessing the EON processing power, so it’s necessary that you run openpilot from this tmux session. If you have openpilot correctly installed, you will see it running on window 0. You can create a new window by typing ` followed by c. Make sure you never close the last window in the tmux session. If the tmux session closes you have to restart your EON.
Now switch to your forked Git repo. Follow this quick guide for more information.
You are ready to run the following script to acquire the car fingerprint:
export PYTHONPATH=/data/openpilot
/data/openpilot/selfdrive/debug/get_fingerprint.pyThis script listens to all the CAN messages published on the Powertrain CAN Bus and prints out a list. While the script is running, turn the car off and on a couple of times and make sure the script is running with the car on for at least 15 consecutive seconds. You will note that the printed text has a dictionary-like structure. For example:
number of messages: 65
fingerprint 36: 8, 37: 8, 170: 8, 180: 8, 186: 4, 426: 6, 452: 8, 464: 8, 466: 8, 467: 8, 547: 8, 548: 8, 552: 4, 608: 8, 610: 5, 705: 8, 800: 8, 849: 4, 896: 8, 897: 8, 900: 6, 902: 6, 905: 8, 911: 8, 916: 2, 921: 8, 933: 8, 944: 8, 945: 8, 951: 8, 955: 4, 956: 8, 979: 2, 992: 8, 998: 5, 999: 7, 1000: 8, 1001: 8, 1017: 8, 1043: 8, 1056: 8, 1059: 1, 1114: 8, 1196: 8, 1279: 8, 1552: 8, 1553: 8, 1556: 8, 1557: 8, 1561: 8, 1562: 8, 1568: 8, 1569: 8, 1570: 8, 1571: 8, 1572: 8, 1584: 8, 1589: 8, 1592: 8, 1596: 8, 1597: 8, 1600: 8, 1664: 8, 1728: 8, 1779: 8,
The number of messages slowly increases over time. Dictionary’s key are the addresses of the messages, while the values are the lengths in bytes of the messages. Some of those messages are published at low frequency, which is why you need to wait several seconds with the car turned on to make sure that you have collected all of the messages. Failing to collect all of the messages will result in openpilot unreliably detecting the fingerprint of your car when you turn on your vehicle.
Step 3 — Test the CAN fingerprintPermalink
Now open data/openpilot/common/fingerprint.py. You will see a Toyota class where each attribute is a Toyota model. Make a new attribute that represents it regardless of whether you are adding a new car model or just a trim. Later on we will eventually simplify the code changes if the new trim can be considered as a sub-case of an already existing car model.
class TOYOTA:
PRIUS = “TOYOTA PRIUS 2017”
RAV4H = “TOYOTA RAV4 2017 HYBRID”
RAV4 = “TOYOTA RAV4 2017”
COROLLA = “TOYOTA COROLLA 2017”
NEW_CAR = “NEW CAR 2018”
Moreover, you’ll see a dictionary of fingerprints, where the key is the car model name that is supported by openpilot. Add the fingerprint dictionary that you obtained in the previous step and save the file.
…
TOYOTA.COROLLA: {…
},
TOYOTA.NEW_CAR: {36: 8, 37:8, …
},
}
Now switch to the windows 0 of your tmux and kill the openpilot processes (Ctrl+c). You will notice that the window will disappear after you press Ctrl+c a second time. Just use any other tmux window of the same session to launch the openpilot processes again by typing:
cd /data/openpilot/
./launch_openpilot.sh | grep “fingerprinted"Look at the printed output. If you see:
fingerprinted NEW CAR 2018then success, openpilot uniquely recognized your car model! If not, try repeating Step 2 (it’s possible that your fingerprint collection wasn’t complete). Also, although your car has been recognized by openpilot, you will likely see some errors when running launch_openpilot.sh. This is because the code is still missing information on how to communicate with the newly added car model.
Step 4 — Try to run openpilot as if the new car model was an already supported model (i.e. you feel lucky)Permalink
Note: the success of this step does not affect the next to-do steps, but it will quickly put you on the right track and it will boost your confidence!
All Toyota car models share pretty much the same API for controlling gas, brake and steer. First try to make openpilot think that your car model is the same as an already supported one. To do so, replace the name of your car in \data\openpilot\common\fingerprint.py with the name of an already supported car and comment out the original fingerprint dictionary for such car. Which car should you try? A good rule of thumb is if your car is a hybrid model, use the Rav4 Hybrid, otherwise try the normal Rav4.
FRC — lateral controlPermalink
Turn off the car and wait at least 20 seconds to clear from eventual faults built during the previous steps. Make sure that the Giraffe’s switches 1 and 4 are off. This will disconnect the stock FRC from CAN.
Restart /data/openpilot/launch_openpilot.sh and turn on your car.
Does the car throw any warnings? If not, openpilot is most likely correctly reproducing all the relevant messages normally published by the FRC.
Now look at the tmux session to see if there are any errors. If not, it is likely that openpilot is already capable of laterally controlling the vehicle in combination with the car’s Adaptive Cruise Control (remember, the stock DSU is still connected so openpilot won’t try to provide longitudinal control).
DSU — longitudinal controlPermalink
First you need to locate the DSU. For currently supported cars, the DSU location is documented here. In almost all the Toyota models we currently support, the DSU is easily accessible behind the glove box which can be removed by hand (note the Corolla has the DSU in an inconvenient location).
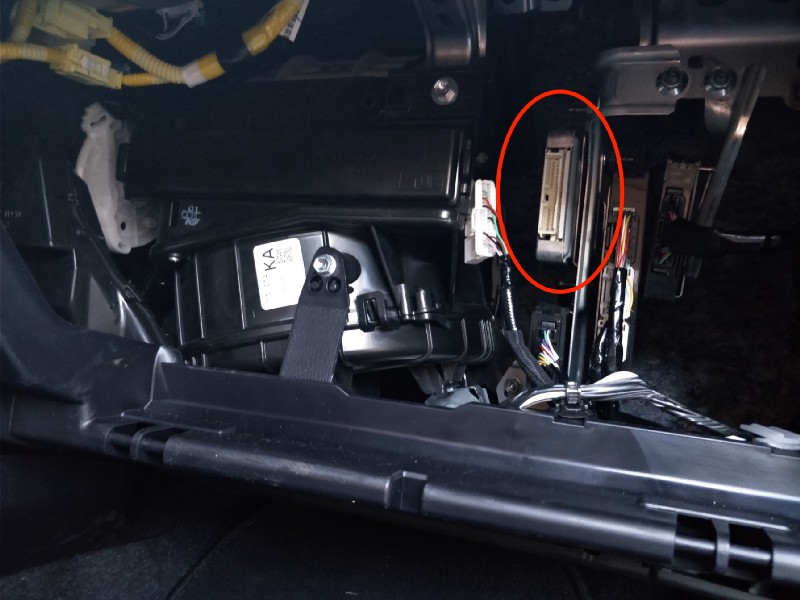
Once the DSU is located, disconnect it and repeat the process described for the FRC. If you get no car and openpilot errors after turning on the car, then openpilot is already reproducing all the relevant messages normally sent by the stock DSU. For now, it’s recommended to keep the DSU disconnected.
Step 5 — Car specific codePermalink
At comma.ai, we realize that openpilot can scale to a lot of car models depending on whether we minimize the amount of code that is specific to each car. Vision models, planning and high level controls are all car independent, while only the low level control tuning (PID loops) and CAN read/write functions have been made car-specific.
Except for the fingerprint and the dbc file, car-specific code is contained in the path /data/openpilot/selfdrive/car. As of now we have two relevant folders, one for each car maker currently supported: /honda and /toyota.
Within each of these folders you can find the following files:
-
carstate.py: this class reads CAN messages from the Powertrain CAN Bus, parses them using the dbc file and converts them in a common car state format: see CarState structure in /data/openpilot/cereal/car.capnp.
-
carcontroller.py: class that receives control data from the controlsd thread (such as abstracted actuators commands, see CarController in /data/openpilot/cereal/car.capnp) and packs them into CAN messages using the dbc file. CAN messages are sent both on Powertrain CAN Bus and Radar CAN Bus.
-
interface.py: class that contains car specific physical parameters, tuning parameters and methods to execute car state and controller updates.
-
radar_interface.py: very similar to carstate.py, this class reads CAN messages from the Radar CAN Bus, parses them and converts them in a common radar state format: see RadarState structure in /data/openpilot/cereal/car.capnp. It’s very unlikely that your unsupported car model will require changes to this file, so you can ignore it.
-
values.py and <car_maker>can.py: these 2 files are a collection of a few functions and classes mainly used by carcontroller.py. In particular,values.py includes a dictionary of static messages that carcontroller needs to send to properly simulate the disconnected ECUs (FRC and/or DSU). In the parent car folder you will find:
-
__init__.py: this file specifies the association between car name and car interface. From now, let’s assume that the folder path is set to the Toyota car folder.
Step 6 — Changes in __init__.pyPermalink
Add the new entry to the interfaces dictionary as follow:
…
interfaces = {
…
TOYOTA.NEW_CAR: ToyotaInterface,
}
…
Step 7 — Changes in interface.pyPermalink
Start with adding physical car parameters for your car model. You should be able to find everything you need online: wheelbase, steering ratio, center of gravity and mass (use average between min and max curb weight).
For all the other parameters, such as control tuning, make temporarily sure they are all defined for the new car model, copying values from the most similar model.
Step 8 — Create a new dbc file for the Powertrain CAN BusPermalink
Fork the opendbc repo and make a new dbc file for your car model in /data/openpilot/opendbc/generator/toyota. Use the following nomenclature:
toyota_<car_model>_<trim(optional)>_
/data/openpilot/opendbc/generator/generator.py This combines the generic toyota dbc file with messages for a specific car model.
Step 9 — Changes in carstate.pyPermalink
Associate the new car model name with the newly added powertrain dbc file in the get_can_parser function.
Also in the parse_gear_shifter function, add the new car model name to the same list as the Rav4.
Step 10 — Changes to values.pyPermalink
STATIC_MSGS is a dictionary where the keys are the addresses of the messages that need to be sent by openpilot so that eventually disconnected ECUs are properly recognized. Each value in the dictionary is a tuple, where the second element is a tuple of car model names. Add the new car model name so that it appears on all the messages where you read CAR.RAV4H or CAR.RAV4, depending if the new car model is hybrid or not, respectively.
Step 11 — Test new car name additionPermalink
For Steps 5 to 10, you were properly defining a new car model name while still treating the vehicle as if it were a Rav4.
For Step 11, turn on the car with the EON connected and both FCCM and DSU disconnected.
As in Step 4, the code has to run without error: make sure that all the threads started by openpilot are properly running. If you see that some of the threads are stopped, you may have missed something between Steps 5 to 10. Fix bugs until no threads crash when you start up the car.
As in Step 4, it’s possible that the car or openpilot still reports warnings (we did not make any new car model specific changes yet). Either way, continue on to the next step.
Step 12 — Capture all the CAN messages sent by the FRCPermalink
Set the Giraffe switches 1 and 4 to on, so the stock FRC is properly connected to the CAN bus. Also, if running, kill launch_openpilot.sh. This will prevent openpilot from sending messages on CAN.
Now, start the boardd thread (needed so openpilot can read CAN messages from the Panda) and the CAN printer script. Type:
export PYTHONPATH=/data/openpilot
/data/openpilot/selfdrive/boardd/boarddand in a separate tmux window
export PYTHONPATH=/data/openpilot
cd /data/openpilot/selfdrive/debug/
./can_printer.py <can_bus> <max_message_addr>where can_bus is the CAN Bus number (0 or 1) and max_message_addr is the max message address you want printed (this is handy since there are usually too many messages and they cannot all be printed on the same terminal):
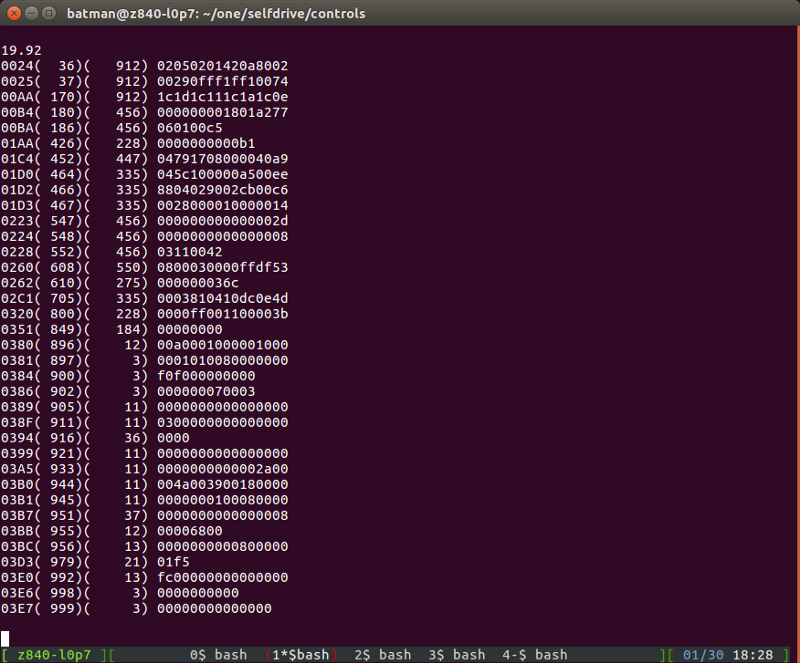
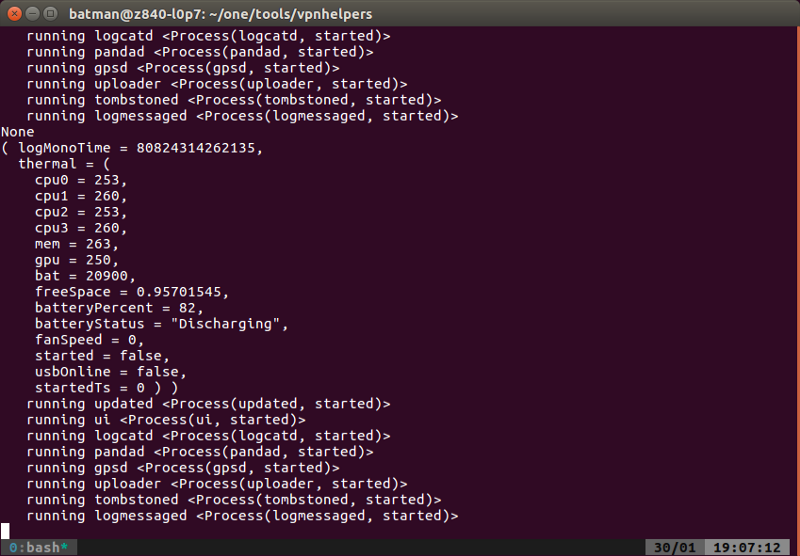
Now turn on and off the Giraffe switch 1 and see which messages stop being updated when switch 1 is off. These are the messages sent by the FRC, and they need to be simulated by openpilot. Take note of these message addresses, their length in bytes (for example in the screenshot above, message 0x3D3 is 2 bytes, while message 0x3E0 is 8 bytes) and their data (especially if static). Repeat the process for both the Powertrain CAN Bus and the* Radar CAN Bus*.
Compare the list of messages you have collected with the messages present in values.py and carcontroller.py and make sure that every message is properly sent. If not, make changes to those two scripts accordingly.
Step 13 — Capture all the CAN messages sent by the DSUPermalink
Repeat what you have done in the previous step, but manually connect and disconnect the DSU instead of switching the FRC on and off.
If you have properly done all the steps up to this point, then you should be able to run launch_openpilot.sh, turn the car on with the FRC and DSU disabled, and have the car display no warnings (regardless of what the outcome was at the end of Step 4).
Step 14 — Verify car statesPermalink
A simple way to test this is to use the debugging script called dump.py to print the content of a specific zmq socket. While the controlsd thread is running, just type:
export PYTHONPATH=/data/openpilot
/data/openpilot/debug/dump.py carStateThe goal is to make sure the dbc file is correct and the car states are correctly interpreted from CAN in carstate.py. If you see mismatches, root cause the issue by looking at carstate.py or in the dbc file. The important car states to verify are:
- vEgo: this is the vehicle speed in m/s. While driving the car, make sure the speedometer speed roughly matches the printed value.
- gearShifter: with the car turned on, move the gear shifter and make sure the printed gear enumeration matches the actual gear lever position (park, neutral, drive etc…).
- leftBlinkers, rightBlinker: booleans that indicate the blinker’s state.
- steeringAngle: from a neutral/straight position, rotate the steering wheel 360 degrees to the left. You should read 360.
- gas: you should read 0 when the gas pedal is released, while you should read 1 when the gas pedal if fully depressed. Note that you can test this with the car in ON ignition mode to avoid revving up the engine when pressing the gas pedal.
- gasPressed: boolean that determines if the gas pedal is pressed or released.
- brakePressed: boolean that determines if the brake pedal is pressed or released.
- steeringTorque: numerical value that represents how much torque the driver is putting on the steering wheel. This value is noisy as it’s measured by a torque transducer. Make sure the value is roughly linearly correlated to the effort that you put in turning the steering wheel. It should be positive when trying to steer left.
- steeringPressed: a boolean that indicates if the driver is putting any torque on the steering wheel.
- doorOpen and seatbeltUnbuckled: booleans that indicates if any of the doors are open and if the driver’s seat belt is unlatched, respectively.
- genericToggle: this boolean is used to facilitate testing for the later steps. By default, it’s arbitrarily linked with the auto high-beam toggle state. You have to have the headlights on for this to work.
Step 15 — Static SafetyPermalink
First, familiarize yourself with how openpilot ensures safety when actuating the car. Now make sure openpilot disengages when:
- brake pedal is pressed;
- gas pedal is pressed;
- cruise stalk is pulled (cruise control cancel);
- toggle button on cruise stalk is set to off;
- any door is open;
- driver’s seat belt is unbuckled.
Step 16 — Dynamic safetyPermalink
Note that this step is the most important and you should perform these tests on closed roads/tracks. Also, it requires the highest coding skills for this guide and you should be a bit “creative” in coming up with ways to test the following steps. In the future, openpilot might include simpler ways to execute those tests.
The idea is to test openpilot by simulating detection mistakes (wrong road curvature, ghost lead detection etc…): assuming the driver is paying attention, openpilot should never respond by controlling the actuators in a way that is uncontrollable by the driver. To manually inject detection errors, you can use the convenient genericToggle boolean in carState. By default, it’s associated to the auto high beam toggle state.
- Max steer command ramp: in carcontroller.py, change the code so that max steer command is sent when genericToggle is True. Drive on a straight road, command max steer and verify that the driver has at least 1 second before having to intervene to avoid the car going over the lane markings.
Repeat the test at different speeds.
For example, the update method of the CarController class in carcontroller.py could be modified as follows: …
def update(self, sendcan, enabled, CS, frame, actuators,
pcm_cancel_cmd, hud_alert, audible_alert):… # init safety test lines
if CS.generic_toggle:
actuators.steer = 1.0
end safety test lines steer torque is converted back to CAN reference (positive when steering right)
apply_steer = int(round(actuators.steer * STEER_MAX))
…* Max steer command steady: in carcontroller.py, change the code so that max steer command is sent when genericToggle is True. While max steer is constantly commanded, test that the driver can easily override the openpilot command. Repeat the test at different speeds. - Steer override, then release: while driving with openpilot engaged, try overriding the steer command so that the openpilot lateral control pushes against the driver’s effort. Test that the car doesn’t swirl too quickly after the driver quickly releases the steering wheel. Repeat the test at different speeds.
- Max acceleration: in carcontroller.py, change the code so that max positive acceleration command is sent when genericToggle is True. On a flat road, test that the vehicle acceleration always remain below 2 m/s² at any speed. You can check the acceleration value by reviewing your drive in cabana and plotting the signal ACCEL_X from the message ACCELEROMETER.
- Max deceleration: in carcontroller.py, change the code so that max negative acceleration (deceleration) command is sent when genericToggle is True. On a flat road, test that the vehicle acceleration always remain above -3.5 m/s² at any speed. You can check the acceleration value by reviewing your drive in cabana and plotting the signal ACCEL_X from the message ACCELEROMETER. If you are not satisfied with the outcome of any of these tests, then you need to change the safety parameters in carcontroller.py and in the panda safety code as well (see /data/openpilot/panda/boardd/safety/safety_toyota.h).
Step 17 — TuningPermalink
If you successfully passed the previous step, then it’s time to test the quality of your port. Focus on:
- Longitudinal control: API on Toyota cars is pretty standard, since openpilot commands the desired longitudinal acceleration and the powertrain control module takes care of converting it into gas and brake commands. Therefore it’s very unlikely that the new car model requires a new longitudinal control tuning. If there are no apparent misbehaviors, you can skip this.
- Lateral control: openpilot controls the steering wheel by commanding a steering torque over CAN. Tune the closed loop control by changing the feedback gains steerKp, steerKi and the feedforward gain steerKf in interface.py. The steering wheel should feel smooth and steady on straight highway roads and be responsive as you enter turns. Change the above mentioned parameters as follows: increase them if the weight of your new car is “high”, decrease them if the steeringRatio is “high”. You can see examples from the already existing tuning.
- Steering override: openpilot has a timer to alert the driver when it has been too long since the last time the driver was engaged with the vehicle. The timer is reset every time the driver manually moves the steering wheel. Ensure that the torque threshold used to determine the steerOverride bit is adequate. The torque threshold should be as low as possible to detect when the driver has his hands on the steering wheel while avoiding any false positive detection.
- Overall quality: during highway or stop-and-go (if supported) driving, openpilot should normally require driver interventions less than once every 6 minutes, except for out-of-scope events, such as close cut-ins, tight turns, stop signs, traffic lights, etc…
Step 18 — Capable of stop-and-go?Permalink
Only three Toyota models have Full Speed Range Dynamic Cruise Control: Prius, Camry Hybrid, C-HR. The stop-and-go functionality will therefore transfer to openpilot.
For car models without stock stop-and-go functionality, openpilot upgrades the low speed longitudinal control as follow:
- for non-hybrid car models, openpilot continues to slow down the vehicle to standstill instead of canceling the system when the speed drops below 28 mph, like in the stock system. However, openpilot is unable to re-accelerate the car below 20 mph with openpilot. Also, openpilot will be engage-able when above 20 mph instead of 28 mph.
- For hybrid car models, openpilot should be able to do stop and go with no limitations. On the Rav4 Hybrid, for example, openpilot is able to perform stop-and-go even though the stock Adaptive Cruise Control can’t. The above cases are just a rule of thumb. You should verify that this actually applies to your car model.
Step 19 — Submit the pull request and link the test drivesPermalink
Make a pull Request from your forked branch into the openpilot devel branch.
In your pull request, refer to the tests you did by linking your drives using Cabana. To facilitate the review of your port, link drives related to Steps 15, 16, 17 and 18.
In particular, for Step 18, link a drive where openpilot is engaged for 6 consecutive minutes. The drive must contain both highway and stop-and-go (if supported) sections.
Step 20 — Be engaged on SlackPermalink
There is an active comma community on Slack. Join us to discuss about openpilot ports and follow us on twitter!
NOTE: this guide is based on old openpilot code. Please join the discord and check our new blog posts for more up-to-date information.
Leave a comment